Tour Our Roaster
Installation and Venting

New Product!
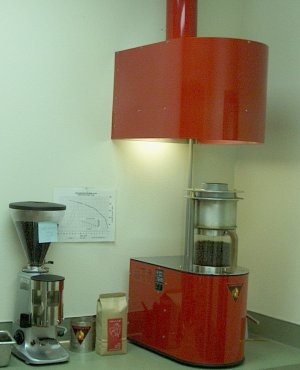
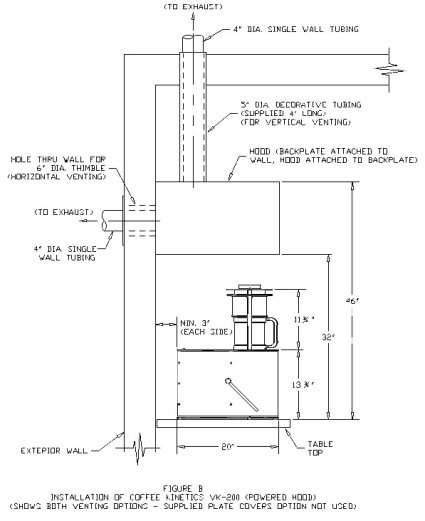
We are now producing a powered hood exhaust kit for our roaster. The powerful blower in the hood will allow you to duct the exhaust for long distances, and makes an attractive and simple installation easy. Venting from the hood can either be run out the back, or straight up through a section of decorative piping and into standard venting materials. The quiet hood blower is more than capable of handling all exhaust products from the roaster, and avoids the problem of back-pressure on the roaster that sometimes arises with long venting distances. The price for this system is $450. It is now available for order from Coffee Kinetics.
Locations for the roaster – basic requirements
We think the roaster will prove most valuable to your business if it is somewhere that your customers can see it in operation. But you may or may not be able to do that. There are really only a few absolute requirements for the installation. They are:
-
The roaster must be in a sheltered location – it is not water-resistant.
-
It must have “breathing room” around the back of the roaster – not less than three inches to the nearest wall.
-
It must be level – check the top with a level to make sure. If it is not level, the motion of the beans may be disrupted during the roasting cycle, and an uneven roast may result.
Hooking up the Roaster to Propane (LPG).
The roaster has a 3/8" male flare
fitting on the back. The propane roaster can be run from the same sort of bottle-regulator-hose arrangement that is common on gas barbecue grills. If you are using a propane roaster indoors, safety considerations require that the propane bottle be outdoors, and plumbed to the location of the roaster. Bottles and regulator/hoses can be purchased at any hardware
store. Regulators/hoses are also available
through Syd and Jerry's.
Hooking the Roaster to Natural Gas
The natural gas roasters should be directly plumbed in to the natural gas line, like any other gas fired appliance. This is a job for professionals, who will have the tools, fittings and experience to provide a solid and safe installation. Make sure the machine you are hooking to natural gas has been built for natural gas (it will say so on the
back), and will have a 1/2" NPT male fitting.
Electric Power
This is an easy one. Just plug it in. The roaster only draws about 3 amps at 115 volts a.c., so no special wiring is required. Roasters built for 240 volt, 50hz service will not run properly on 115 volts, 60hz. Check the back panel.
Venting
There are several reasons to vent your roaster properly, unless you are using it outdoors. Venting an indoor installation will prevent accumulation of carbon monoxide, and, in the unlikely event of a roaster fire, will provide a safe escape route for the combustion products. There are several options for safely venting an indoor installation, including:
-
The roaster can simply be placed under a hood, like a stove or other gas appliance.
-
The roaster exhaust can be ducted through 4” diameter steel tubing to a nearby
hood.
-
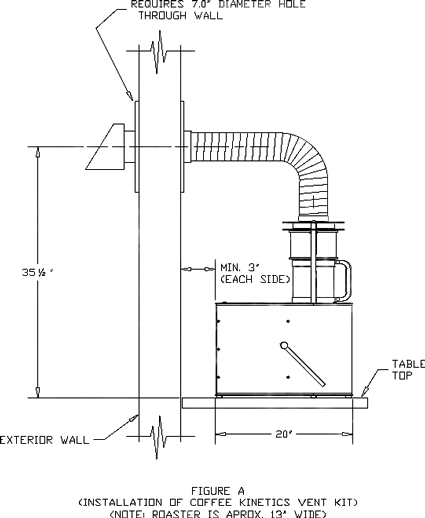
The roaster can be vented through a nearby outside wall using the “vent kit”
as shown in Figure A below. Ventilation Kits
are available through Syd and Jerry’s.


Back to Tour
|


